Ascent Guide
Everything you need to understand the Ascent dashboard, from password setup and Amazon connection through to listings, orders, history, settings, workflow templates, manual overrides, billing, and API keys.
There are three setup checks that matter most
- 1Create your dashboard password and connect Amazon so Ascent can access the seller account data it needs.
- 2Complete Settings and review your workflow so Ascent knows your VAT percentage, automation state, workflow criteria, marketplace coverage, and billing access.
- 3Check your COGs on the Listings page so Ascent can calculate profit and ROI correctly for each product.
Once those steps are done, Ascent has what it needs to start repricing properly and doing the heavy lifting without guessing.
Connect Ascent to your own tools or AI agents
Ascent includes an Account API for secure automation, reporting, and agent workflows. Create an API key from Settings, copy it when shown, then use the docs to connect external tools safely.
Getting Started
Create your password, sign in to the dashboard, connect Amazon, and work through the first-time setup checks before repricing goes live.
Home
Use Home as the new dashboard command centre for performance metrics, Buy Box status, minimum-price warnings, and recent repricing activity.
Listings
Use Listings to manage SKU-level guardrails, search and filter your catalogue, import setup changes, and edit COG, min price, max price, workflow rule, VAT, and repricing status.
Orders
Review recent Amazon orders, inspect profit and ROI, export order data, and use real sales performance to decide which SKUs need guardrail changes.
History
Use History as the repricing audit trail for every price move, reason, old price, new price, SKU, and timestamp.
Settings
Manage subscription access, marketplace defaults, VAT, Auto COG, repricing automation, workflow templates, custom workflow rows, and customer API keys from Settings.
Workflow Rules
Understand how Sicilian, Vienna, Gambit, and Marshall behave inside workflow templates, custom workflow rows, and manual listing overrides.
Getting Started
Create your password, sign in to the dashboard, connect Amazon, and work through the first-time setup checks before repricing goes live.
Start in the new dashboard
The Ascent dashboard lives at www.ascentrepricer.com/dashboard/. Use this dashboard for account setup, billing, marketplace settings, listings, orders, history, workflows, and repricing controls.
After signup, Ascent sends a welcome email with a secure link to create your password. Once your password is set, sign in to the dashboard with the same email you used at checkout.
The first-time setup panel shows the checks that matter before automation is trustworthy: Amazon connection, listings, COG coverage, repricing status, workflow preview, and subscription access.
Create or reset your password
New users should use the welcome email to create a password. Existing users can use Forgot password on the dashboard login page if their old app password does not work.
The reset link is sent to the billing email on your Ascent account. If you do not see it, check spam first, then contact support.
Connect Amazon
If Ascent does not yet have your Amazon refresh token, the dashboard will ask you to choose your main marketplace and authorise Ascent in Seller Central.
After Amazon redirects you back to the dashboard, Ascent creates your user folder, saves the refresh token, and starts using that account data for the dashboard.
First checks after login
- open Settings and confirm your primary marketplace
- check VAT percentage, repricing switch, and workflow before turning Ascent loose
- use Review workflow in the setup panel to jump straight to the workflow editor
- open Listings and make sure COGs are present for important SKUs
- use the listings filters to find missing COGs, FBM items, suppressed Buy Box items, and listings at minimum
- use Intercom on the dashboard if something looks wrong
Getting Started
Create your password, sign in to the dashboard, connect Amazon, and work through the first-time setup checks before repricing goes live.
- Create your password from the welcome email.
- Sign in at www.ascentrepricer.com/dashboard/.
- Connect Amazon if prompted.
- Use the first-time setup panel to review automation and workflow readiness.
- Confirm Settings before relying on automated repricing.
- Check Listings for missing COGs and unusual guardrails.
Use the dashboard setup panel as the source of truth during onboarding. It is there to stop half-configured accounts from looking healthier than they are.
Home
Use Home as the new dashboard command centre for performance metrics, Buy Box status, minimum-price warnings, and recent repricing activity.
Read the account snapshot first
Home is the first page you see after login. It gives you the high-level health of the account without making you dig through every listing.
Use the time period controls to switch between short-term movement and longer-term trends. The goal is to spot whether Ascent is winning Buy Box, protecting margin, and moving stock as expected.
What Home shows
- active listings and repricing coverage
- Buy Box wins and listings at minimum
- recent price movement and pricing history preview
- stock and marketplace context
- quick links into Listings, History, and Settings
How to use the metrics
If Buy Box wins are low, inspect the Listings page and History page before changing rules. The issue may be price, stock, marketplace coverage, or missing COG data.
If many listings are at minimum, your rule criteria may be too strict, your COGs may be wrong, or the market may simply be too competitive for those SKUs.
Recent repricing activity
Home shows a short preview of recent pricing actions. Use it for a quick scan, then open History when you need the full audit trail.
A price increase that later comes back down is not automatically a problem. Ascent tests the market, then adjusts when the Buy Box or competition changes.
Home
Use Home as the new dashboard command centre for performance metrics, Buy Box status, minimum-price warnings, and recent repricing activity.
- Check Buy Box wins and listings at minimum.
- Review recent repricing activity.
- Open Listings for SKU-level issues.
- Open History when you need the exact reason for a price change.
Home is for diagnosis, not heavy editing. Make changes in Listings or Settings after you know what the metrics are telling you.
Listings
Use Listings to manage SKU-level guardrails, search and filter your catalogue, import setup changes, and edit COG, min price, max price, workflow rule, VAT, and repricing status.
Control listing guardrails from one place
Listings is where you manage the actual SKUs Ascent is repricing. It is designed for fast filtering, targeted edits, and exception handling.
You can search by SKU, ASIN, title, or rule, then narrow the view using status filters such as Missing COGs, Winning Buy Box, At Minimum, Suppressed Buy Box, Repricing, Not Repricing, and FBM.
You do not need to add a currency symbol when entering cost or price values.
Find the listings that need attention
Use Missing COGs first during setup. Ascent needs reliable COG data to calculate profit and ROI correctly.
Use At Minimum to find listings where your guardrails are stopping further price drops. Use FBM when you want to review merchant-fulfilled listings separately from FBA listings.
Edit a listing
Click the edit control on a listing to open the edit popup. Save changes before closing the popup; unsaved edits are not applied.
If you manually change the rule on a SKU, it becomes a manual override. The selector only offers rules that exist in the active workflow, and the override uses the matching workflow criteria rather than the old default rule criteria.
Use Reset to age automation when you want that SKU to stop using its manual rule and follow the workflow age ranges again.
- COG
- pricing rule
- minimum price
- maximum price
- repricing on or off
- whether VAT applies to that listing
Bulk setup import
The CSV setup import can update guardrails in bulk. Ascent previews matched, unmatched, and invalid rows before applying changes, so check the preview carefully before confirming.
Imported rule values must be valid for the active workflow. Rows using a rule that is not currently active are rejected instead of silently creating a bad override.
- SKU
- COG
- minimum price
- maximum price
- rule
- repricing status
How minimum price actually works
Your listing minimum price is not the only safety net. Ascent also respects the minimum profit and ROI criteria set in Settings.
For example, if a listing has a GBP 0 minimum price but your Settings criteria require GBP 3 profit, Ascent will still avoid prices that fail the GBP 3 profit rule.
Listings
Use Listings to manage SKU-level guardrails, search and filter your catalogue, import setup changes, and edit COG, min price, max price, workflow rule, VAT, and repricing status.
- Filter for Missing COGs during setup.
- Use FBM to review merchant-fulfilled listings separately.
- Edit SKU-level COG, min price, max price, workflow rule, repricing, and VAT from the popup.
- Use CSV import for bulk setup changes.
- Reset manual rule overrides when a SKU should follow age automation again.
Most listings should stay on workflow automation. Use listing-level rule overrides for deliberate exceptions, not as a replacement for a clean workflow.
Orders
Review recent Amazon orders, inspect profit and ROI, export order data, and use real sales performance to decide which SKUs need guardrail changes.
Review order-level performance
Orders shows recent Amazon order activity alongside profitability context. It helps you understand what sold, whether the sale was healthy, and which SKUs deserve attention.
Use Orders after checking Home when you want to connect dashboard metrics to actual sales.
What to review
- order ID and order date
- SKU and ASIN
- profit and ROI
- current rule and pricing context
- links back to Amazon or Seller Central where available
Use orders to guide repricing decisions
If a SKU is selling but profit is weaker than expected, open Listings and review its COG, minimum price, maximum price, VAT setting, and rule.
If a SKU is not selling, compare Orders with History. The listing may need a more aggressive rule, a lower minimum, or simply more time in the market.
Export orders
Use Export CSV when you want to review order data outside Ascent or share it with a spreadsheet workflow.
Orders
Review recent Amazon orders, inspect profit and ROI, export order data, and use real sales performance to decide which SKUs need guardrail changes.
- Review profit and ROI on recent orders.
- Look for SKUs with weak margins or repeated sales pressure.
- Use Listings for the actual guardrail change.
- Export CSV if you need spreadsheet analysis.
Orders tells you what happened commercially. History tells you why Ascent changed price. Use both before changing a rule.
History
Use History as the repricing audit trail for every price move, reason, old price, new price, SKU, and timestamp.
Audit every repricing action
History is the full audit trail for Ascent repricing actions. Use it when you want to know what changed, when it changed, and why.
This is the best page for troubleshooting unusual movement on a SKU because it shows the reason attached to each action.
What History shows
- date and time
- listing title, SKU, and ASIN
- old price and new price
- price difference
- reason for the change
- rule used for that action
Search and export
Search by title, ASIN, SKU, or reason to isolate one listing or one type of repricing behaviour.
Use Export CSV if you want to inspect the audit trail in a spreadsheet or keep a local record.
How to diagnose a listing
If a listing looks too low, search the SKU in History and read the latest reason. Then check Listings for COG, VAT, min price, max price, workflow rule, and whether the SKU has a manual override.
If a listing keeps hitting minimum, inspect whether the criteria are too strict or whether the market has moved below your profitable floor.
Workflow and manual override checks
When a SKU has a manual rule override, History shows the rule used for the action. Use that rule together with the active workflow to understand which profit and ROI criteria were applied.
After changing workflow rows or resetting a manual override back to age automation, check History on the next repricing cycle to confirm the SKU is following the expected criteria.
History
Use History as the repricing audit trail for every price move, reason, old price, new price, SKU, and timestamp.
- Search the SKU or ASIN.
- Read the latest reason attached to the price move.
- Compare old price, new price, and rule.
- Open Listings if the guardrails or manual override need changing.
- Export CSV for deeper review.
Do not change rules blindly. History usually gives you the clue you need before touching Settings or Listings.
Settings
Manage subscription access, marketplace defaults, VAT, Auto COG, repricing automation, workflow templates, custom workflow rows, and customer API keys from Settings.
Configure how Ascent should behave
Settings is where you define account-level behaviour. This page controls billing access, marketplace coverage, VAT, Auto COG, repricing automation, workflow templates, custom workflow rows, and API keys.
Getting Settings right matters because these values become the safety rails for every listing unless you create a listing-level manual override.
Use Settings to choose a workflow template, review the workflow rows, and save the active repricing strategy.
First-time setup panel
The setup panel at the top of the dashboard summarises account readiness. It checks Amazon connection, listings, COG coverage, repricing status, workflow preview, and subscription access.
Use Review automation to inspect the account-level repricing switch. Use Review workflow to jump directly to the workflow editor rows.
Account and billing
The top of Settings shows the signed-in account, email, primary marketplace, enabled marketplace count, plan, and billing status.
Use Manage Stripe billing or Manage Whop billing to open the correct billing portal for your account. If billing management is unavailable, contact support from the dashboard.
VAT
Enter your VAT rate as a percentage, then click Save fees. If you are not VAT registered, use 0. If you are VAT registered, use your actual rate, such as 20 for UK standard VAT. This changes profit calculations, so do not guess.
Auto COG
Auto COG is controlled from Settings, in the Automation panel. Turn Auto COG on, click Save automation, then let Ascent pick it up on the next inventory refresh. It fills the COG field for new listings when the cost is already built into the SKU.
Ascent reads the second part of the SKU as the cost. The SKU must use one separator style consistently: dashes only or underscores only. Do not mix dashes and underscores in the same SKU for Auto COG, because mixed SKUs are skipped to avoid pulling the wrong number.
- Dash format: super-20.00-230323-OA-40.00-VA1 gives a COG of 20.00
- Underscore format: super_20.00_230323_OA_40.00_VA1 gives a COG of 20.00
- Unsupported mixed format: super-20.00_230323_OA_40.00-VA1 should be entered manually or renamed before relying on Auto COG
Check Auto COG after enabling it
After enabling Auto COG, open Listings and use the Missing COGs filter. Supported new SKUs should have their cost filled automatically; anything still shown there needs a manual COG or a cleaner SKU format.
If a SKU uses a supplier format, marketplace prefix, bundle code, or mixed separators, do not assume Auto COG has understood it. Check the COG before letting repricing depend on it.
Workflow templates
Choose a workflow template when you want a sensible starting point for age-based repricing. Templates map stock age ranges to rules, profit floors, and ROI floors.
The workflow preview uses listing age data to show how the template will affect the account. Review the projected impact before saving, especially on accounts with ageing stock or many manual overrides.
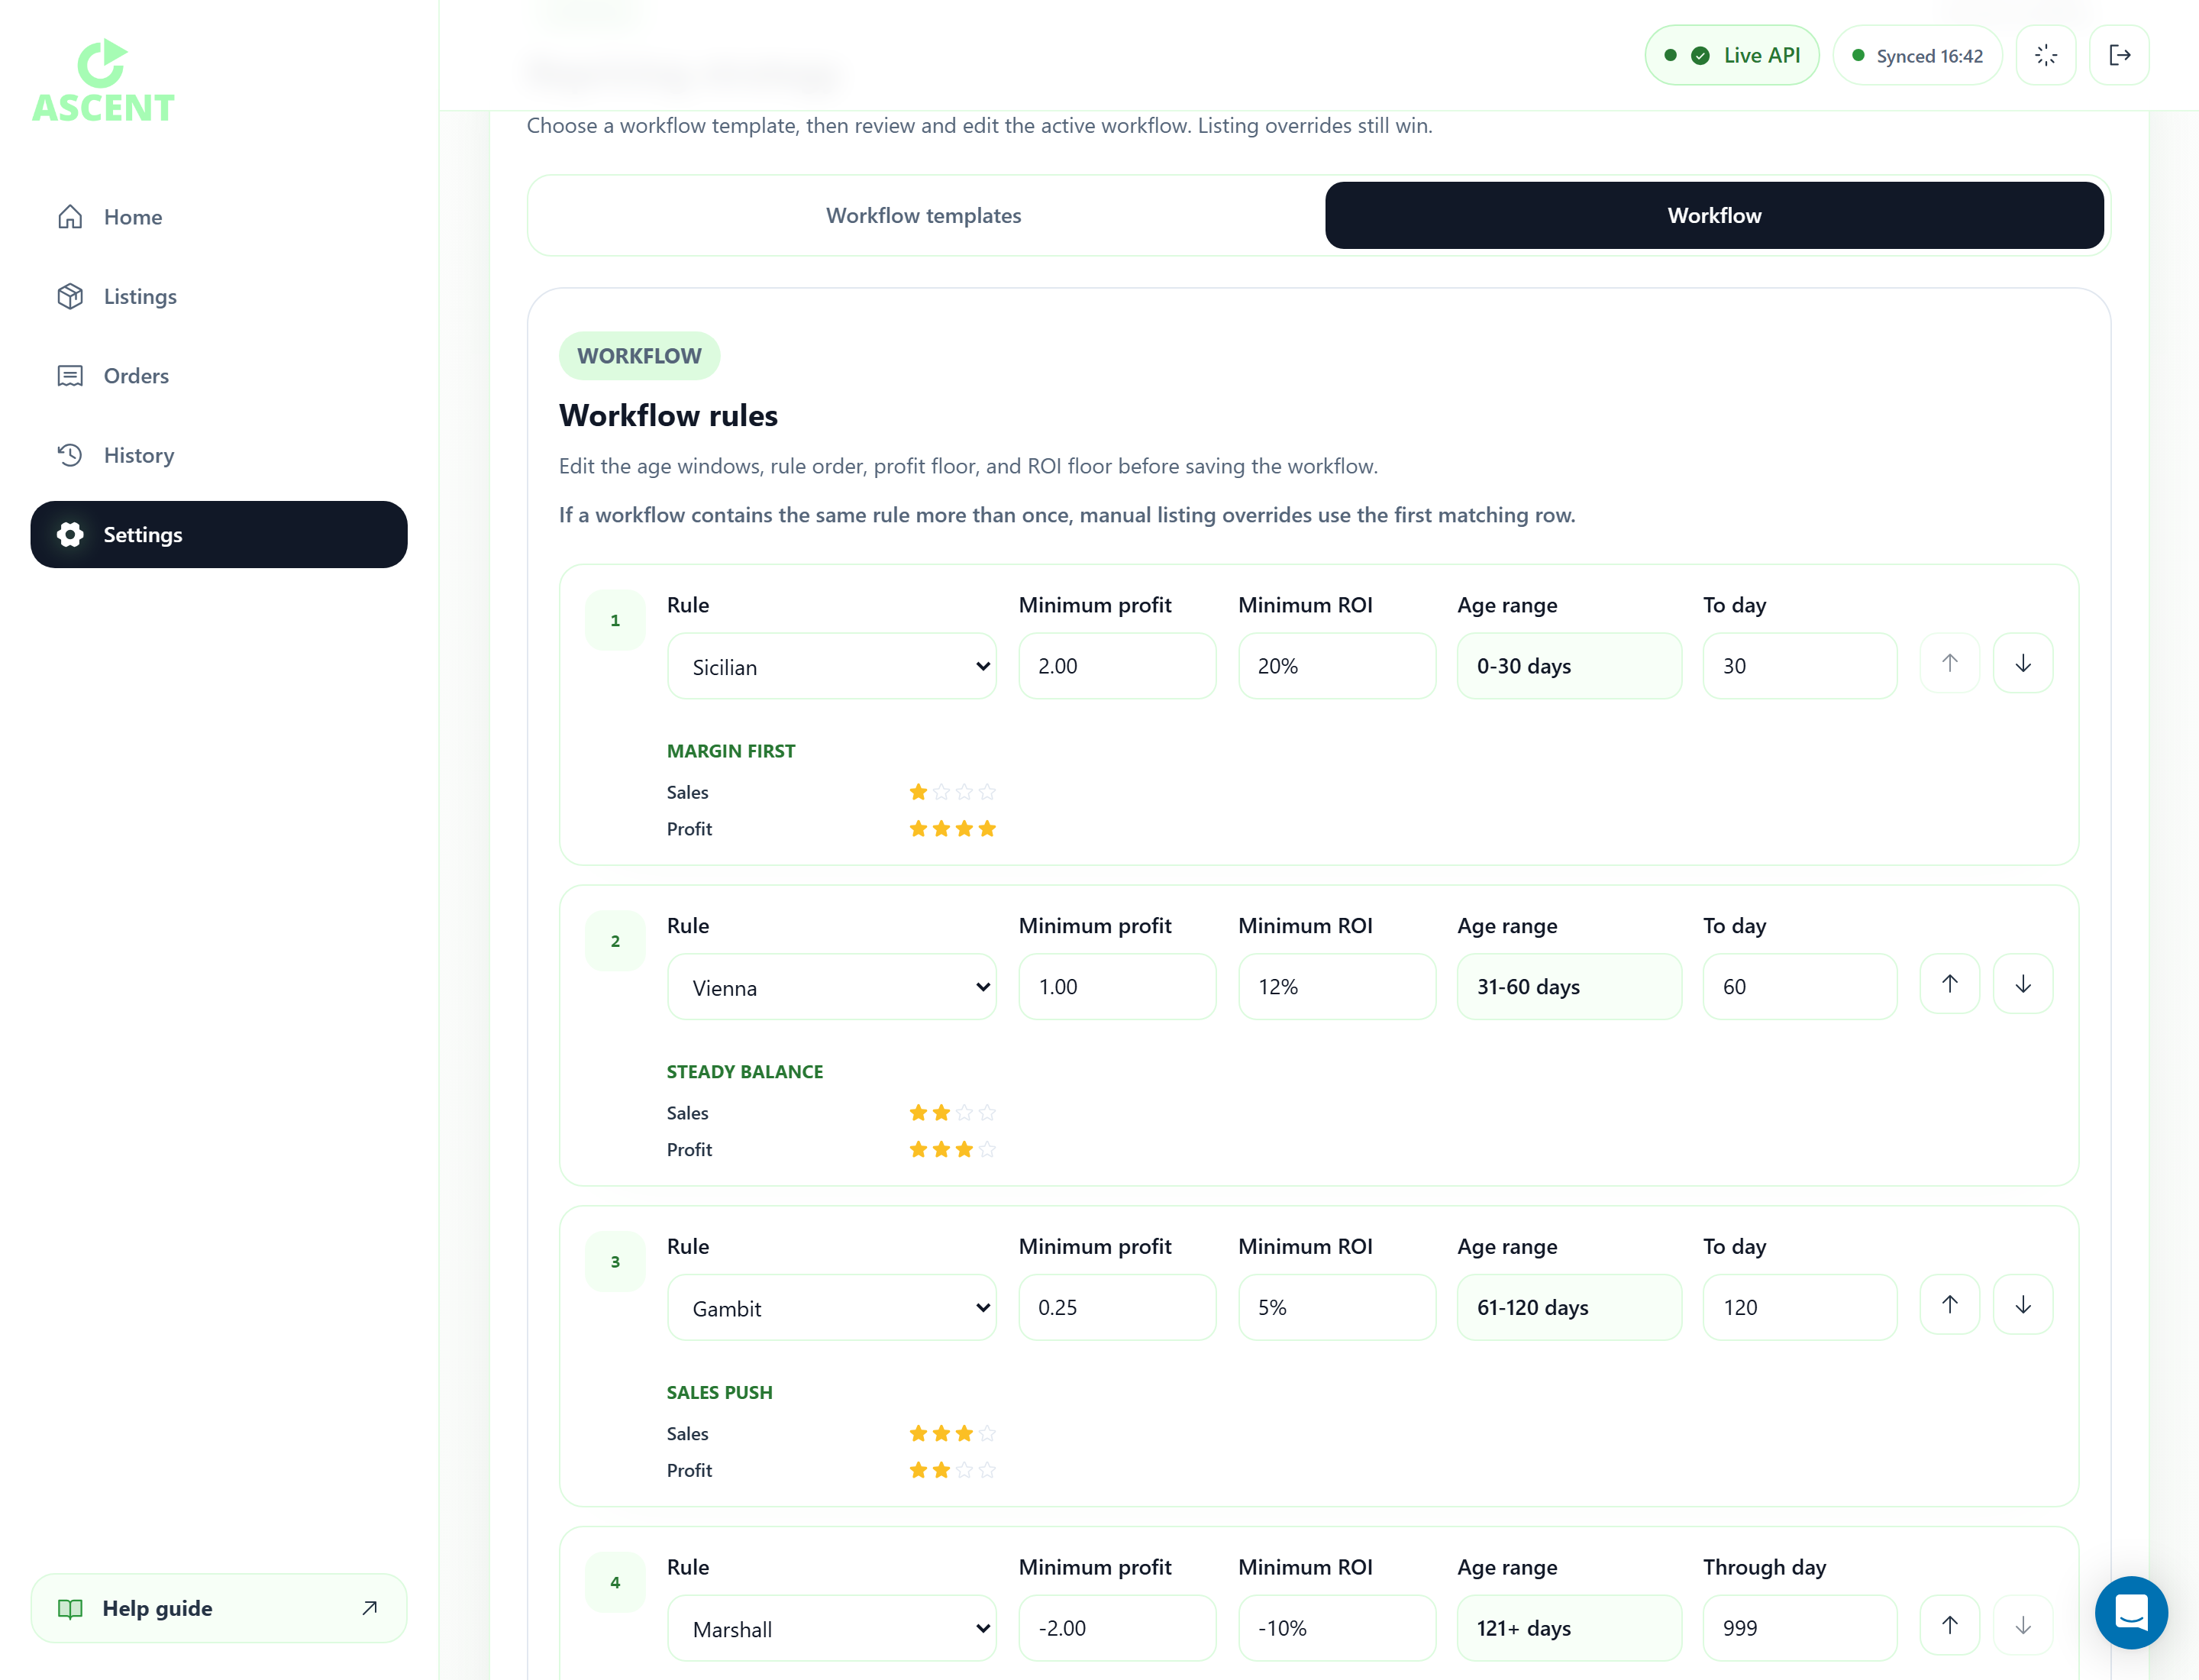
Custom workflow rows
Custom workflow rows let you edit the rule order, age windows, minimum profit, and minimum ROI before saving the strategy. This is now the main place to configure account-level repricing behaviour.
Age automation uses these rows to decide which rule a listing should follow as stock gets older. Manual listing overrides still win until you reset that SKU back to age automation.
If a workflow contains the same rule more than once, manual listing overrides use the first matching row. That behaviour is intentional, so avoid duplicate rule names unless you are comfortable with the first row being the manual-override target.
Marketplace coverage
Choose your primary marketplace and enable only the countries you actively sell in. Unavailable countries are hidden automatically.
For non-default marketplaces, set a fallback rule, minimum profit, and minimum ROI. Keep these minimums realistic, especially where returns, fees, or cross-border costs are higher.
API keys
The API access panel lets you create one customer API key for external tools, reporting, or AI agent workflows.
Copy the key when it is shown. For security, the full value is only displayed immediately after create or refresh. Refreshing or deleting a key will stop connected integrations that use the old key.
Settings
Manage subscription access, marketplace defaults, VAT, Auto COG, repricing automation, workflow templates, custom workflow rows, and customer API keys from Settings.
- Confirm account and billing status.
- Set VAT percentage correctly, using 0 if you are not VAT registered.
- Open Settings, turn Auto COG on, then click Save automation.
- Use Auto COG only when the second SKU segment is the product cost.
- Check Listings, then filter for Missing COGs after the next inventory refresh.
- Review the setup panel until the workflow preview is trustworthy.
- Choose a workflow template or edit the custom workflow rows.
- Configure marketplace coverage.
- Create an API key only when an integration needs one.
Settings are account-wide. If one SKU needs special treatment, use a listing-level manual override instead of weakening the whole workflow.
Workflow Rules
Understand how Sicilian, Vienna, Gambit, and Marshall behave inside workflow templates, custom workflow rows, and manual listing overrides.
Understand the rules inside a workflow
Ascent includes four repricing rules: Sicilian, Vienna, Gambit, and Marshall. Each rule has a different balance of profit protection and sales aggression.
Rules now live inside the active workflow. The workflow decides the age range, profit floor, and ROI floor for each rule row, and Listings uses that workflow when applying manual SKU overrides.
How workflows use rules
A workflow is an ordered set of rule rows. Each row contains a rule name, an age window, a minimum profit floor, and a minimum ROI floor.
When a SKU follows age automation, Ascent chooses the row that matches the SKU age. When a SKU has a manual rule override from Listings, Ascent matches that rule against the active workflow and uses the matching row criteria.
Sicilian
Sicilian is the least aggressive rule and is designed to protect margin. It is a sensible starting point for listings where profitability matters more than speed of sale.
Vienna
Vienna is the balanced rule. Use it when you want steady Buy Box competition without pushing as hard as the more aggressive rules.
Gambit
Gambit is aggressive and sales-focused. It competes harder for the Buy Box and is useful when you want stronger stock movement.
Marshall
Marshall is the most aggressive rule. Use it for maximum sales pressure or ageing stock that needs to move, knowing that profitability may be lower.
Workflow selection guide
A common approach is to start with Sicilian or Vienna, move to Gambit as stock ages, and reserve Marshall for stock that needs the strongest push.
- Sicilian: best for margin protection
- Vienna: best for balanced profit and sales
- Gambit: best for stronger sales aggression
- Marshall: best for maximum stock movement
Manual overrides and duplicate rules
Manual listing overrides should be used only for genuine SKU exceptions. The override still uses the active workflow criteria for that rule rather than separate legacy criteria.
If the same rule appears more than once in a custom workflow, a manual override uses the first matching row. This is explicit product behaviour, not a bug.
Workflow Rules
Understand how Sicilian, Vienna, Gambit, and Marshall behave inside workflow templates, custom workflow rows, and manual listing overrides.
- Start cautiously when margin matters.
- Use workflow age rows to increase aggression over time.
- Use manual listing overrides only for genuine exceptions.
- Avoid duplicate rule names unless you want manual overrides to use the first matching row.
- Check History after workflow changes to see how Ascent behaves.
Aggression is not automatically better. The right workflow row is the one that matches the SKU, margin, stock age, and sales goal.